

Black Deck EP:
Tech demo:
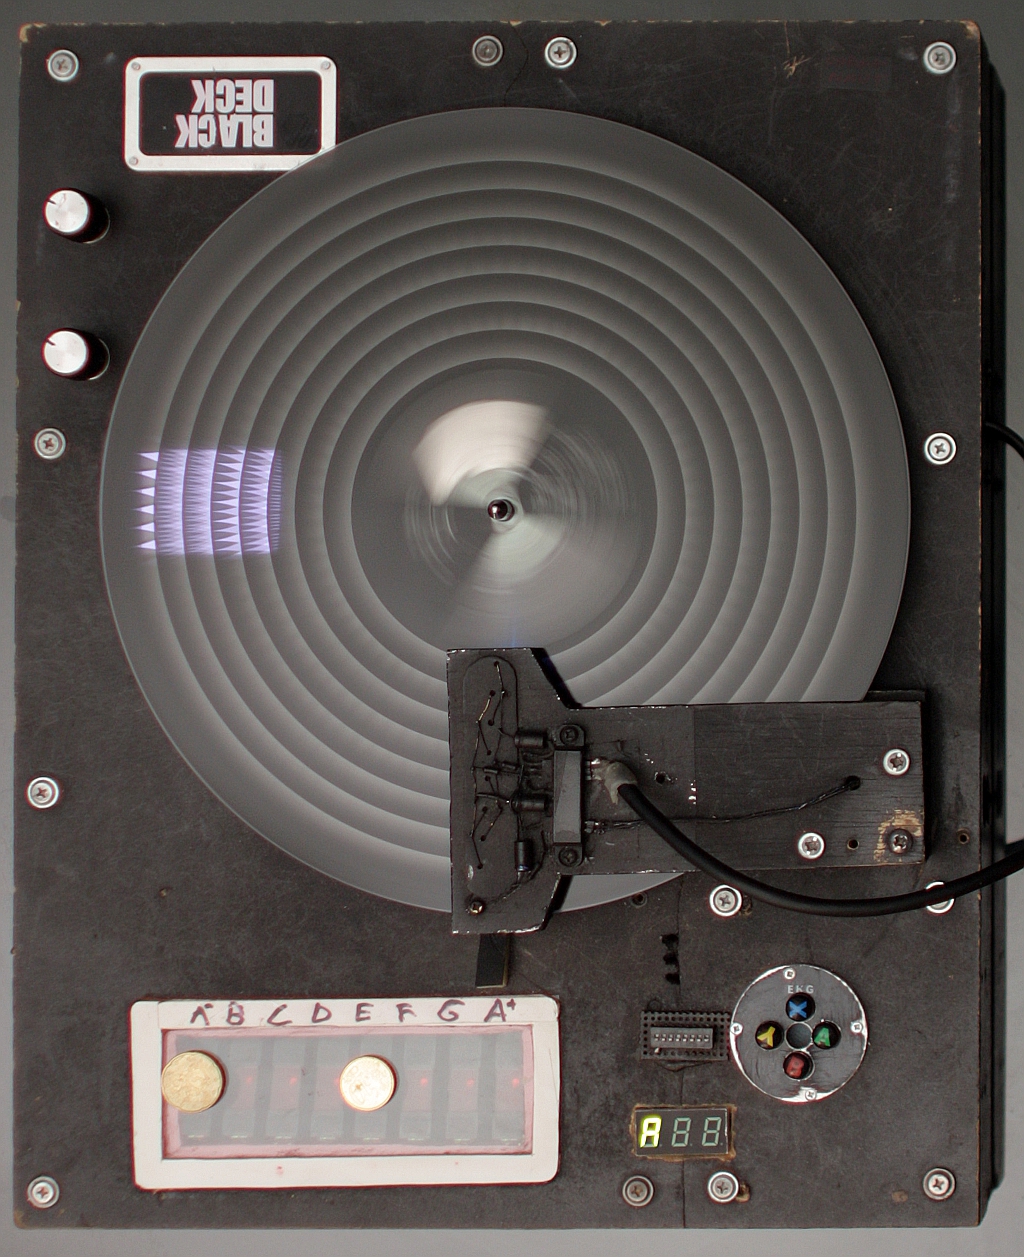
During the Christmas holidays of 2005, I started to build Black Deck, an opto-electric musical instrument that superficially resembles a record player. The name Black Deck comes from a philosophy of recycling and a Black & Decker name plate I had lying around. I had attended Jimi Tenor's concert in Oulu and seen his combination of a transparent rotating disc attached to a motor, a photosensor, and a table lamp. The contraption was called The Photophone. On his disk of black-and-white film there was a pattern of harmonics of a single frequency, with lower harmonics closer to the center of the disk. It was probably a square wave. I thought there was potential in the idea, and that it could be developed into a musical instrument capable of playing melodies.

From the local dump yard I found a direct-drive LP turntable. It was broken somehow; the rotation speed was not constant. A simple fix was to strip the machine of all the speed control circuitry. Luckily, this resulted in the motor going as fast as it could, given the dissipative forces in the system. I measured the rotation speed, 3.5198 Hz (211.188 RPM). Later I would find this to be temperature-dependent, with higher temperatures giving lower speed. From the same dump yard I had salvaged a bagful of phototransistors, Nokia phone keyboard flexible circuit boards with blue LED's, and easily enough E3S-AD83 photoelectric switches to make an 8-note keyboard. Before I started assembling everything, I made a bit of [wpaudio url="http://yehar.com/blog/wp-content/uploads/2011/03/valo.mp3" text="testing" dl="0"] with simply a phototransistor and a rotating disc. I can't remember what the light source was, anyhow, it was at the other side of the disc. The sound was dark, but otherwise satisfactory. Encouraged by this, I made program in C++ that produced the image of a disc with the approximate frequencies of A Minor. I laser-printed the image onto two A4 transparencies and taped them together to form the complete disc.

My father Paavo Niemitalo kindly lathed a piece of plastic to act as a base plate, attached to the shaft. I bought a piece of ~2 mm transparent plastic for 5 €, and cut out an LP-sized disc to act as a secondary plate that would support the disc. Then I repeated the [wpaudio url="http://yehar.com/blog/wp-content/uploads/2011/03/valo2.mp3" text="sound test" dl="0"]. Well, apparently, the concept worked. So I proceeded to make a functional tonearm and to install the keyboard. The first revision was finished for Christmas 2005, and I could already play some [wpaudio url="http://yehar.com/blog/wp-content/uploads/2011/03/blackdeck1.mp3" text="improvised music" dl="0"] (recorded with two discs in two takes) with it. The voltage was 12 V and I recall using 220 Ω series resistors to limit current going through the LED's. I had planned the tonearm to be connected to a piston, so that the tone of the instrument could be modulated by blowing into a tube. Unfortunately, too much force was required to move the tonearm, and I had to scrap that idea. But I did not fix the tonearm in place, to enable manual tone modulation.


In the first revision of Black Deck, the starts and ends of notes gave clicks. This was because the envelope generated by the photoelectric switches (that function as the keyboard) is simply on/off, with no smooth transition between the two states. Before New Year 2006, I had ready a filtering system that employed 33 μF capacitors between ground and the outputs of the photoelectric switches. There was an additional bank of 1000 μF capacitors that could be connected by a switch of a DIP switch, to achieve more gradual attacks and decays in the envelope, if desired. I had planned to route audio through the tonearm shaft into the chassis, but at least with unshielded cables this was too noisy, so at least until this date (2011-03-09) the audio output cable must be attached directly to the upper part of the tonearm. At revision 2, Black Deck remained in this state for a long time. I showed it off to friends over the years. Joonatan Elokuu was especially interested, noting that "one could record an album with Black Deck alone".


In autumn of 2010 Joonatan asked me to accompany him and Jaakko Padatsu (Lingua Fungi) in a mixed folk-ambient music performance at the Veljesiltamat event in Oulu, Finland. I agreed. Nominally, I functioned as part of Lingua Fungi. The three of us worked amazingly well together, and within 5 days we had ready a one-hour set based mostly on Joonatan's existing repertoire of songs. The works were released as an album in August 2012 under the Utupuu label, and can be bought as digital download at bandcamp. (You can read more about the artwork for the release).


By this time, a multi-effect electric guitar pedal, DigiTech RP80, had become an integral part of my Black Deck setup. The pedal made the sound more interesting and versatile, and extended the modulation capabilities of Black Deck. Here is a [wpaudio url="http://yehar.com/blog/wp-content/uploads/2011/03/bdsamples.mp3" text="a sample" dl="0"].

Because I had made all the discs in A Minor, we had to transpose everything to A Minor for the gig with Joonatan Elokuu and Lingua Fungi. And it appeared that the tuning drifted to about 338 Hz instead of the standard 440 Hz. This was worrisome, because if the temperature changed a lot during the gig, Black Deck would go out of the tune of the other instruments. Luckily this did not happen to a noticeable extent at Veljesiltamat. It was probably a good idea to let the instrument warm up at the location beforehand. After the gig I added 10 kΩ helical potentiometers in series with the two ~16 V AC input phases to the motor driver. A bit risky, because the helipots could easily be fried. I did fry the whisker in one of them, but managed to replace it with a sturdier piece of wire. This setup could be called Black Deck rev. 3. During summer 2010 I had met with Jussi Alaraasakka (Nick Electro), who played electronic music mostly with groove boxes, and joined him and the other guys to play Black Deck in Oneironaut. Use of the tuning knobs was a bit difficult, because when switching between songs that required different tuning, I had to play Black Deck while tuning it. So it was not that friendly for the audience, or for my bandmates. Before we had our first gig, I managed to finish a stroboscope that could be set up to flash at the frequency of any wanted note. Viewing the stroboscope through the rotating disc displayed a still image when the disc rotated at the correct frequency. So I could tune silently and accurately, to everyone's satisfaction. In 2011 I integrated the stroboscope into Black Deck, rev. 4. This revision has the original LP turntable power supply removed, and contains integrated +5 V, +16 V and -16 V power supplies. The photoelectric switches, the stroboscope, and the phototransistors work at +16 V, and the motor driver uses both +16 V and -16 V. The tuning potentiometers are in series with the power lines to the motor driver. By turning off the power supply of the other polarity, one can make a kind of fast vibrato, with the disk accelerating only at certain angles of the drive shaft, and the dissipative forces slowing it down at the others. At the heart of the stroboscope is a PIC16F877A microcontroller, running at +5 V, telling a fast-switching power transistor when to light up the strobo (iPod display backlight).

Over the winter 2010-2011 I continued to play Black Deck with Oneironaut. Joonatan Elokuu and his wife Helena lived at my place for some time in early 2011, giving us another opportunity to work together musically. In that time, we finished three pieces. Joonatan played electric quitar and did the vocals, and I played Black Deck and did additional sampling, mixing and post-processing. Helena did additional vocals and Kata Havahu played saxophone. The work has been released as a downloadable extended play (EP) via Kiiltomatolyhty/Utupuu and can also be found at SoundCloud.

The C++ source code for the disc image generator is here: valo1.0.zip. It works at least on Windows with Dev-C++.
I’m impressed you made it sound so good, the samples wasn’t too impressive. :)
So I guess the next step is to make possible to play chords, but I then you need to alter the disc so that a tracks has the same “bmp”.
Another idea is make the buttons digital so that you create arpeggios. :)
Great work and good luck!
Regards
Jari
I was supposed to write “the early samples wasn’t too impressive.”
The one sounded great.
Jari,
Thanks!
Playing chords is already possible, but limited by the low number (8) of keys. I’m not sure what exactly you mean by the tracks having the same bmp (BPM?). They are on the same disc so by the virtue of that, they will rotate at the same speed in any case. :-)
Digital buttons, or keyboard not directly connected to LED’s but via a processor, I will implement that in the next version. This would also enable variable envelopes and MIDI input and output. There is already a MIDI port in Black Deck, but currently it’s just sending out a dummy sync signal.
Nice project! Very creative. I am interested in playing around with this concept a bit, would it be too much to ask for the C++ code you used to create the disk images?
I have put the source code at the end of the article. Please lemme know what you come up with, I’ll be interested to hear!
How much are you selling your instrument and a set of the discs for? I want to buy it. How do you print the discs out on transparancy?
Tony, this unique unit is not for sale. I may design a model that can be manufactured in number, but this will take time if it ever happens. My current estimate is that mass-produced units would sell for around 500 EUR or 650 USD, or at half price for parts / kit only. Discs I can sell for 5 EUR or 5 USD a piece.
For simple black/white waveforms, printing at 1200 dpi (dots per inch) with a laser printer or copying from a paper template with a copier works the best, but this requires taping two A4 (~letter) transparencies together, as I haven’t encountered cheap A3 laser transparencies or cheap enough A3 printers with adequate resolution. The taped seam will usually be audible, but not disturbing, as it can be thought of as characteristic of the instrument. I have also tried using a photographic-quality A3 inkjet printer on specially coated A3 transparencies. While this gives superior quality for gray-scale waveforms, the coating and the inks are not water-resistant, and the ink is costly. I have tried spraying inkjet prints with a special inkjet lacquer, but this is expensive and does not give complete water resistance. I have been thinking that maybe I should try making the discs directly on x-ray film, which is large enough, cheap and widely available. But this would require making a special device to do the the exposure, and to get the required development chemicals. Not impossible, but a lot of work. So maybe for a mass-produced model I would reduce the disc size so that A4 or letter would be enough.
so roughly 700 total for the unit and the 10 discs you created. or do you have more than 10 discs? I want to buy it! Make me one i’ll pay with paypal or check. Where are you located? near NYC?
Tony, I’d love to sell you a Black Deck as soon as making more becomes possible. I will let you know. I live in Oulu/Finland, so at a bit of a distance. Are you a musician of sorts?
What effects are you using on Black Deck to make the bass/drum sound in “Smoke Signal”? It sounds amazing!
Richard: Thank you for your interest! I’ll tell you what I remember. I have there two discs on top of each other so that they act like amplitude/ring modulation. The first one gives the bass tone so that I can play notes and chords. The second one is a rhythm disc, just a simple decaying envelope repeating itself. How many times it repeats itself per rotation depends on which microtrack is playing, so I get faster beats every now and then by modulating the tonearm position. The discs are rotating very slowly so that the rhythm is slow enough. Then there is the quitar pedal, no fancy effects, I think, basic distortion. In mixing: EQ (and maybe transient enhancer to make the beat stronger). You can hear a more raw version of it above the Digitech pedal image.
Great work !
I try to compile the source code but it doesn’t work because it try to load a unknown file. I’ts to difficult to me.
Can you share de program to launch it on Windows ?
Sorry for my bad english
Thanks in advance
Boite, sorry the program is not interactive but you need to modify the source code to make changes to the images it generates.