Disabling the ThinkPad X200 master control for wireless radios switch
2010-08-18
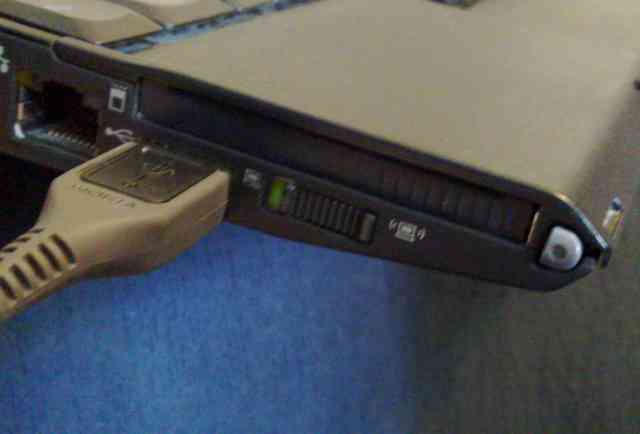
I became very annoyed by the reoccurring disturbances to Internet connectivity by the overly sensitive master control for wireless radios switch of my ThinkPad X200 laptop. So I superglued it to ON position.
The master control for wireless radios switch. Glued to ON position.
No help. The glitches were still there, shutting down WLAN randomly and whenever I pressed my palm against the palm rest. So it wasn't just me accidentally pushing the switch, although I admit doing that too. I endured the nasty Windows message boxes and WLAN dropouts for quite a long time, until I finally decided to get rid of the problem once and for all by electrically hard-wiring the switch to ON position. A very good decision, one which I should've made much earlier!
Inside the laptop. That dreaded switch... In ON position, the outermost terminals were, or should have been, connected. In OFF position, the two rightmost (from this viewing angle) terminals were connected.
Removing the switch was easy. (WARNING: Others have had problems with this step and suggest more gentle alternative approaches, see comments.) What worked for me: A firm grip with pliers, and a rolling motion towards the upper part of this image worked fine. I tried turning on the computer like this, with all terminals disconnected, but the state of the switch was detected as OFF. In my opinion, other than having no software disable for the switch, this was the design error made by Lenovo engineers. The switch should work so that the state is switched only when a connection is made.
A jump wire was soldered between the outer terminals. This did the trick!
Remove the power cord and battery. Remove all screws from the back, except for the four screws that keep the screen hinges in place, and the RAM slot cover screws.
This is how many screws you should have at this point. Let me count... 10 with red tips and 1 smaller one. The screw holding the hard disk slot cover is not here. I broke the thin plastic cover long ago.
Pry open the wristrest with your fingernails
The wrist rest and keyboard should now come off nicely. (If not, you should have removed more screws!) Pull off their connectors.
With the keyboard and wrist rest away, this is how it looks in there
Now let's start removing screws from the inside. We need only to remove the ones that hold down the mainboard. Let's start with these two. Note that the screws down here are different, so sort the screws according to where you took them from so that you know where to put them back later.
This ribbon cable must be detached from the mainboard
Flip open the connector and you can simply lift up the end of the ribbon cable
Remove the two black screws (the other is already removed in this image) holding down the WLAN card. If you have a different model, you may have some other stuff here, so act accordingly.
Remove the WLAN card (or whatever you have there, that might hold down the mainboard)
Remove this screw
Remove these three screws (two black ones and one silver)
Remove the screws holding down the display connector
Lift up the display connector to detach it
Remove the hard disk. Could've done this much earlier...
Pry off the plastic strip that goes around the left, upper and right part of where the keyboard was. Start from either end.
Lift up the metal coverings so that you can pull out the mainboard underneath. You may have to detach some small pieces of adhesive tape first
When pulling out the mainboard, be careful not to injure this ribbon cable
When the mainboard has come loose, flip upside down the computer with the screen slightly open, so that you can allow the mainboard to rest on it. Now the culprit of all the troubles is nicely accessible... Remove the switch and solder a jump wire connection between the outer pads. (See the first three images of this article!)
When you have done the deed that had to be done, it is time to put everything back together again. Start by putting the mainboard in its correct place.
When putting back in the mainboard, again, be careful not to injure this ribbon cable
Push in the wireless LAN card (or whatever you have there)
Attach these three black screws
Attach these two black screws and the silver screw
Put the WLAN antenna cables under this ribbon cable
Lay the ribbon cable down into the connector
Close the connector
Make sure the WLAN antenna cables are properly connected to the WLAN card
Attach these two screws
Push down the display ribbon cable connector into its slot
Attach the two screws that hold the connector in place
Put back the hard disk
Reattach the large plastic strip
This is how the insides look at this point
Attach the keyboard connector
Attach the wristrest connector
Put the keyboard in place and snap the wrist rest in place
Reattach the screws in the back
The smaller screw goes here
Ahhhhh... the bliss.
18 thoughts on “Disabling the ThinkPad X200 master control for wireless radios switch”
Ugh! I have the exact same problem. But really, should we have to all that? I thought the hardware button would simplify things, not make them harder…
Thanks, worked great! On my version: 74542GU, there were some extra screws and screws of a different color than the ones in your pictures. Also, the switch removed looked a bit different, The jumper soldered in was the same, though. I think the switch just wore out. In Linux (Debian 6.0), you can “software” disable both bluetooth and wifi, so jumping it into the always on position is not such a big deal.
Thanks, this damn switch was pestering me everytime I accidentally touched it, as every light touch made it switch to OFF and switching it ON again always was a real pain. I already though about taping it off, you solution, ableit being more work, is much nicer!
Hi,
please dont disasemble the Thinkpad X200 like this, if you have bad luck, loads of plastic clips will break!
Use the Hardware Maintenance Manual, nothing should go wrong if you stick to it.
That has nothing to do with warranty or somenthing else, its jut to protect you from ruining the case of your laptop.
Bleughh, what a pain in the arse! Thanks for posting this, I thought I’d do a quick google before delving into the iwlwifi bug tracker. I thought I might have subtly broken the modified BIOS I’d created (I wanted to use a 6300N card, but it wasn’t whitelisted).
The detailed pictures were helpful. When I desoldered my switch, I ripped up the right most pad. No wonder I’d been having trouble, I’m reasonably adept at soldering, I have managed to solder ~20 wires to TQFP footprint pads…
Needless to say, everything seems much more reliable.
Nice job. I recently acquired a Thinkpad T60, which also has a similar switch, but I have not yet detected any issues with it. Maybe you should have poked around to see if there’s a more accessible to solder the permanent connection (assuming the middle pin can be permanently tied to ground without issues, in case the switch would go over to the off position. Maybe there’s even a mod that can be done on the actual wi-fi card if the switch is routed all the way to the card.
As for your prying open of the wristrest, you’re doing it wrong! I needed to get into my wristrest compartment, in my case for a RAM upgrade, and I wanted to be careful so I checked the service manual. The recommended solution is to unscrew four screws, then put a flat object in one of two slots and pivot toward yourself. These slots are on my T60 situated below logo and alt keys, and below the right side of the space bar. The cover will then release on the side facing the keyboard, and pivot around the other side.
When I removed the switch by twisting it upwards, the middle contact tore off the mainboard pcb. I was lucky it was the middle one, so I could still solder the jump wire.
I would recommend removing the switch by heating it with soldering iron instead of twisting.
Hi Olli
Thank you so much for this fix. I actually just did it on my X200s which has a very similar built, almost no difference.
Im not used to soldering, did it in my youth a bit, and the contacts are so near each other! First I got the the left and middle contact connected, aaahhhh!
But finally I succeeded.
Because I didnt read all the comments I had to reopen the wristrest to rescrew the two (in my case) screws to hold the main board.
I encourage everyone to do this maneuver, its after all not so difficult.
yours, LUzi
I was googling for a hard block = yes on my thinkpad x200 and for the life of me i can’t figure out how to turn the hard block to = no. I tried installing various distro of linux and win7 to no avail. Windows 7 says to turn the switch on. I believe my switch turn faulty after some prolong use or badly designed and engineered. I come to the conclusion that switch has has been stuck on the “off” position and switching to on does not put it back to “on” position. I’m going to tear down my x200 and see if that’s the case and do what you have done and permanently solder it on to on position :) Thanks for the help article! Cheers!
Hi. I figured before trying this fix I’d try WD40. I turned off the computer and removed the battery. I think carefully squirted some WD40 into the swtich. I vigourously moved it on/off/on/off etc maybe 50 times. I then repeated with more WD40 and more on/off/on/off. I let it dry overnight to be sure there’d be no problems.
I started it fine the next morning and the switch now functions perfectly. I have not had one problem with the wifi switching off since then (I did this about 6 months ago). Hopefully it’ll stay that way! Maybe worth a try before dismantling your computer!
Hello, thank you for the detailed post and guide. However to others here with a lack of ability in soldering I would like to let you know the issue seems to be due to some loosening in the underside of WiFi switch. I was able to make the switch a bit reinforced by removing the screw that holds the slide button down. Placing a piece of cardboard sourced from a lid of small USPS postal box in the spot. Then scoring a hole In the cardboard so I can screw the hardware switch back down on top of it. This makes the toggle quite stiff and honesly i can probably have used a thinner cardboard but it works. I can still also slide the hardware cutoff off if i so choose….of course as mentioned not as smoothly due to the stiffness…but I rarely ever need to do that.
The advice to remove the switch by pulling off can lead to tearing the pads off of the board.
Also, this solder can be done more easily and without the use of an additional wire. If you pull back the black covering of the mother board near the switch, you will see two small dots of solder just above the switch. These dots are just to the left of the C501 capacitor. The dots are less than a millimeter apart and can be easily joined with a single blob of solder. Joining the two dots with solder does the same thing as was done above with the wire.
I got it fixed! Never noticed that small switch under dirt at the bottom side of my machine, something like here. Yes, it was apparently a hard lock problem. Thank you for your general debugging instructions, learnt a ton. user25257 Sep 22 ’11 at 0:00


Ugh! I have the exact same problem. But really, should we have to all that? I thought the hardware button would simplify things, not make them harder…
I think the switch should be better constructed and in a position that will not be touched accidentally, next to the power button for instance.
Thank you so much. It worked!!!!!!!!!!!
Thanks, worked great! On my version: 74542GU, there were some extra screws and screws of a different color than the ones in your pictures. Also, the switch removed looked a bit different, The jumper soldered in was the same, though. I think the switch just wore out. In Linux (Debian 6.0), you can “software” disable both bluetooth and wifi, so jumping it into the always on position is not such a big deal.
Thanks, this damn switch was pestering me everytime I accidentally touched it, as every light touch made it switch to OFF and switching it ON again always was a real pain. I already though about taping it off, you solution, ableit being more work, is much nicer!
Yep! And the tape might now even work in the long run, just like the glue didn’t in my case.
Hi,
please dont disasemble the Thinkpad X200 like this, if you have bad luck, loads of plastic clips will break!
Use the Hardware Maintenance Manual, nothing should go wrong if you stick to it.
That has nothing to do with warranty or somenthing else, its jut to protect you from ruining the case of your laptop.
Bleughh, what a pain in the arse! Thanks for posting this, I thought I’d do a quick google before delving into the
iwlwifibug tracker. I thought I might have subtly broken the modified BIOS I’d created (I wanted to use a 6300N card, but it wasn’t whitelisted).The detailed pictures were helpful. When I desoldered my switch, I ripped up the right most pad. No wonder I’d been having trouble, I’m reasonably adept at soldering, I have managed to solder ~20 wires to TQFP footprint pads…
Needless to say, everything seems much more reliable.
Nice job. I recently acquired a Thinkpad T60, which also has a similar switch, but I have not yet detected any issues with it. Maybe you should have poked around to see if there’s a more accessible to solder the permanent connection (assuming the middle pin can be permanently tied to ground without issues, in case the switch would go over to the off position. Maybe there’s even a mod that can be done on the actual wi-fi card if the switch is routed all the way to the card.
As for your prying open of the wristrest, you’re doing it wrong! I needed to get into my wristrest compartment, in my case for a RAM upgrade, and I wanted to be careful so I checked the service manual. The recommended solution is to unscrew four screws, then put a flat object in one of two slots and pivot toward yourself. These slots are on my T60 situated below logo and alt keys, and below the right side of the space bar. The cover will then release on the side facing the keyboard, and pivot around the other side.
When I removed the switch by twisting it upwards, the middle contact tore off the mainboard pcb. I was lucky it was the middle one, so I could still solder the jump wire.
I would recommend removing the switch by heating it with soldering iron instead of twisting.
Hi Olli
Thank you so much for this fix. I actually just did it on my X200s which has a very similar built, almost no difference.
Im not used to soldering, did it in my youth a bit, and the contacts are so near each other! First I got the the left and middle contact connected, aaahhhh!
But finally I succeeded.
Because I didnt read all the comments I had to reopen the wristrest to rescrew the two (in my case) screws to hold the main board.
I encourage everyone to do this maneuver, its after all not so difficult.
yours, LUzi
I was googling for a hard block = yes on my thinkpad x200 and for the life of me i can’t figure out how to turn the hard block to = no. I tried installing various distro of linux and win7 to no avail. Windows 7 says to turn the switch on. I believe my switch turn faulty after some prolong use or badly designed and engineered. I come to the conclusion that switch has has been stuck on the “off” position and switching to on does not put it back to “on” position. I’m going to tear down my x200 and see if that’s the case and do what you have done and permanently solder it on to on position :) Thanks for the help article! Cheers!
Hi. I figured before trying this fix I’d try WD40. I turned off the computer and removed the battery. I think carefully squirted some WD40 into the swtich. I vigourously moved it on/off/on/off etc maybe 50 times. I then repeated with more WD40 and more on/off/on/off. I let it dry overnight to be sure there’d be no problems.
I started it fine the next morning and the switch now functions perfectly. I have not had one problem with the wifi switching off since then (I did this about 6 months ago). Hopefully it’ll stay that way! Maybe worth a try before dismantling your computer!
Hi. Thx for this instructions. At the end I had one screw left. But it works. :)
Hello, thank you for the detailed post and guide. However to others here with a lack of ability in soldering I would like to let you know the issue seems to be due to some loosening in the underside of WiFi switch. I was able to make the switch a bit reinforced by removing the screw that holds the slide button down. Placing a piece of cardboard sourced from a lid of small USPS postal box in the spot. Then scoring a hole In the cardboard so I can screw the hardware switch back down on top of it. This makes the toggle quite stiff and honesly i can probably have used a thinner cardboard but it works. I can still also slide the hardware cutoff off if i so choose….of course as mentioned not as smoothly due to the stiffness…but I rarely ever need to do that.
The advice to remove the switch by pulling off can lead to tearing the pads off of the board.
Also, this solder can be done more easily and without the use of an additional wire. If you pull back the black covering of the mother board near the switch, you will see two small dots of solder just above the switch. These dots are just to the left of the C501 capacitor. The dots are less than a millimeter apart and can be easily joined with a single blob of solder. Joining the two dots with solder does the same thing as was done above with the wire.
Thank you very much from ARGENTINA!! I´ve been dealing arround this issue since a while, now I´ll do the trick to solve it!!
I got it fixed! Never noticed that small switch under dirt at the bottom side of my machine, something like here. Yes, it was apparently a hard lock problem. Thank you for your general debugging instructions, learnt a ton. user25257 Sep 22 ’11 at 0:00