2005-08-26

 Doing the following will void the warranty of your camera and also might destroy your camera, although I don't think that should happen. If this is OK with you, please read on!
Introduction
A network adapter will be handy for a camera if you intend to take a lot of pictures from the same position indoors, for example if you are shooting a puppet animation or taking time-lapse shots of a rotting loaf of bread. A Canon AC adapter for EOS 300D costs about 50 EUR. A battery costs about 5 EUR. So it makes sense to make an AC adapter out of a battery and save some money. So buy the cheapest BP-511 battery that you can find and follow as described.
Instructions
You will need a BP-511 battery, a power cable, optionally a connector for the power cable, and a power supply in the range of 8-10 V DC. And of course some tools like a soldering iron, a sturdy knife and some glue.


An un-branded BP-511 battery costing 5 EUR + shipment
It is better to start with an un-charged battery so that any short circuits will not lead to damage to the cells. Open the battery with a sturdy knife by pressing the knife inwards-downwards through the gap between the two sides. Be careful not to puncture the cells. Once you are done with half of the job, the rest may come off simply by a bit of force.


Opening the battery
Use a soldering iron to disconnect the electrical connections by which the cells and the circuit board are attached to the enclosure.


Removal of the LiIon cells (electrical connections to be disconnected are marked)
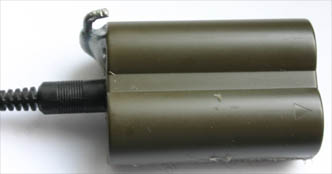
Now you have the battery enclosure ready to take in your wirings instead of the cells. Just connect the + and - of the empty battery to the + and - of the power supply, preferrably with the help of an added connector at the outer end of the battery enclosure. Check the polarity of your power supply and solder the wirings accordingly. I happened to have a connector that fit my powersupply handy so I used that. Once you are done with the soldering, check once more the polarity with the power supply turned on, and proceed to glue the parts and the upper half of the enclosure in place. Engulf everything inside the enclosure in glue. I used heat glue but the heat seems to soften and bend the plastic enclosure, so you may wish to use some other sort, or apply the glue more carefully. Also try to avoid spilling the glue on the outside of the enclosure. Pay special attention to keep the electrical connection rails clean.


Enclosure, emptied, and a connector for the power supply


Checking the polarity. Only two of the four pins on the battery will be used


The insides of the adapter soldered and glued
At this point I noticed that the closed lid of the battery slot presses a small button that reports the camera that everything is OK. But while there is a cable sticking out from inside, the lid cannot close. So also the adapter must be adapted to press this button. I did this by adding a nail, removing its head and bending it so that it reaches the tiny button on the body of the camera. Some more glue will fix the nail in place so that it does not rotate.


A nail is added, and bent so that it presses a button on the camera body.
The voltage of the power supply that I am using can be adjusted, and I ended up at 9.5 V so that the camera will not think that the battery is running out, which was a problem at 7.5 V.


A final adjustment of the variable power supply voltage
Finished! The adapter is just inserted into the camera and the camera is turned on and used normally.


A bathroom mirror shot with the power cable and the open battery compartment lid visible.